|
Setting up PC’s in Treatment Areas Abstract Capable 21C can support different modes of operation to support offices that choose to operate PC’s in their treatment areas and/or waiting areas. These different modes are intended to allow the operator of each PC to readily access the functionality that they require without being encumbered by the functionality that they do not require. This knowledgebase article provides instructions, guidelines and suggestions on how best to implement these features. Underlying challenge There are significant benefits in having a PC in a treatment area. Visit Notes can be entered directly. Historical information including images, digital diagnostic information and previous notes can be accessed immediately. However, the risk with operating a PC in a treatment area is protecting patient/client privacy. If the practitioner is not always present, it is possible that a patient/client may attempt to use the PC to glean information about their own file and/or others. The trade off between security and functionality is that the tightest security interferes with ease of use. Resolution Once an office commits to installing PC equipment in treatment areas, the following factors should be considered in the installation of those PC’s.
Once the PC hardware has been installed, networked, and configured to allow the normal operation of Capable 21C, the following factors should be reviewed:
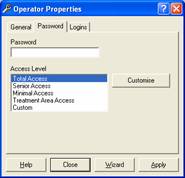
The office should also review its backup strategy to ensure that client/patient files are protected against accidental or malicious loss. A single backup media that is re-used every day is inadequate, as the office may not realize that information has been lost until several days after the event. Having several backups that are rotated appropriately is a much safer arrangement. Detailed Information The Capable 21C treatment area window appears as follows:  The window is resizable, and can be located anywhere on the Capable 21C window. If Capable 21C is in ‘Appointment Book’ mode, the treatment area window will not be visible. If Capable 21C is in ‘Treatment Area’ mode, the treatment area window will be visible, but the appointment book window will not. If Capable 21C is in ‘Appt Book + Treatment Area’ mode, both windows will be visible. These modes are accessible from the Mode menu. See below for specific details and advice about using this option. A single left click on any patient/client box on the treatment area window will open Visit Notes for that person. A right click (or clicking on the > button) will produce a menu of options including opening Visit Notes, or moving the person into another area. If the security settings for the operator have been configured appropriately, it may not be possible to move people in and out of all areas. In addition, the ‘Patient/Client Info’ button may not be enabled. In addition, the Visit Notes may not be accessible for patients/clients that are not in the same area as the PC. See below for more information about appropriate security settings. Photos Note that in the sample provided above, no photos are visible for the patients/clients. To attach photos, go to the Visit Notes window, navigate to the images tab, and click the button to add images. Capable 21C only supports photos in the JPG and BMP format. The photo for a patient must have Photo.JPG or Photo.BMP as its filename. Use the file browser to locate and select the file that contains the photo. The patient/client’s photo should now appear automatically whenever the patient/client appears on the treatment area window. Setting up the office areas Whilst it may be tempting to configure Capable 21C with every discreet area in an office, this may make it harder to manage the movement of patients/clients. Some thought should be given to the areas before they are configured. The following list is suggested: The area properties window looks like this: 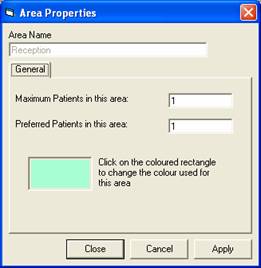 To configure the areas, go to Setup|Setup Office Areas. Use the ‘New Area’ button to create a new area. Each area should be configured with a name, a colour, a maximum number of patients/clients and a preferred number of patients/clients. At this stage, the maximum number of patients/clients and preferred number of patients/clients are not used by Capable 21C. Future releases that incorporate more detailed workflow features will use these settings. Configuring Capable 21C to match the area where the PC is installed To configure each installation of Capable 21C to match the area where the PC is installed, go to Setup|Settings, and navigate to the ‘General’ tab. The Setup|Settings window looks like this:  Choose the appropriate area from the drop down list. Setting security privileges for staff To enter the details and security privileges for each staff member, go to Setup|Setup Operators. Double click an operator’s name to alter their privileges, or click the ‘New Staff’ button to enter a new staff member. The staff member properties window looks like the image displayed on the left: To set the security privileges, go to the password tab. 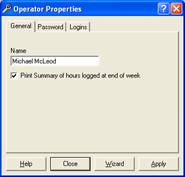
The password tab looks like the image displayed on the right:
Each operator should have a password that they keep secret and do not share with anyone. Passwords are case sensitive. The following major access levels are predefined within Capable 21C, but can be customized to suit the office’s needs:
Custom access allows specific menu options to be granted or denied to each operator. The customized access window looks like this: 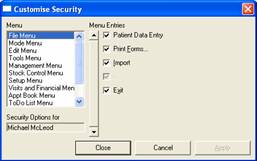 Each option on each menu can be granted or denied. If a tick is showing, the menu option is granted to that operator. The key options that affect the treatment area PC’s are as follows:
Turning on the Capable 21C security system To enable Capable 21C’s security system, go to Setup|Settings, and navigate to the ‘General’ tab. The General tab appears as follows: 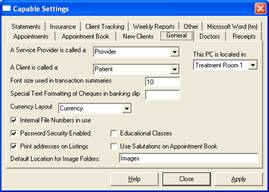 To enable the security system, tick the box labeled ‘Password Security Enabled’. Note that once the security system is enabled, the Log In and Log Out buttons will appear on the Things To Do window. Operators will need to Log In to Capable 21C before they may be selected as the current operator. It is also advised that staff Log Out of Capable 21C when they finish for the day to reduce the risk of their privileges being used inappropriately by other staff (or patients/clients). In all cases, if the security system is enabled, an operator can click the ‘Select a different operator’ button and walk away from the PC. Once the ‘Select a different operator’ button has clicked, no functions will be accessible until a new operator has been selected and their password correctly keyed. If someone attempts to cancel from that window, the system will deny access to all functions (except selecting a new operator). Switching a PC into treatment area mode To switch a PC into treatment area mode, go to the Mode menu, and select the appropriate option. Each PC will remember which mode it was last using, and Capable 21C will restart in that mode if it is closed and re-opened. Note that the usual operators of the treatment area PC’s should not have the privileges to select the options in the Mode Menu. They will not be able to put their PC’s in treatment area mode. It will be necessary for another operator (with greater privileges) to select themselves as the current operator of those PC’s temporarily, switch the PC’s into treatment area mode, and then select the usual operator. |
This knowledge resource is designed
for use on a Windows (tm) XP system operating at a screen
resolution of 1024x768 or better. Windows Media Player must be
installed for this training resource to operate correctly. Copyright 2008 Capable Software Pty Ltd Training Sessions Other Resources |